

How To Change Axis Units In Excel
"Not once again…" I recollect to myself every time I change the minimum and maximum values of a chart centrality. Information technology'southward such a slow chore, and I know I'll exist doing it over again at a future point. It but takes a few seconds, simply all that time starts to add upwards. There are various chart objects we can link to worksheet cells; source information, chart titles and data labels can all be linked to cells, but the chart axis is fix by hardcoding a number into the Format Axis options window.
Well… I'thou not and then easily defeated. I decided to build a more dynamic solution. I turned to my old friend VBA, and started to tinker. Beneath yous'll find the consequence of that tinkering; a formula which exists on the worksheet to command the min and max values of a chart centrality. Link that formula to a cell and suddenly information technology is possible to set the chart axis based on a cell value.
Hopefully, by the end of this post, you too can share in the automated jail cell linked bliss I now experience.
If you're non familiar with VBA, don't worry, I'll talk you through information technology footstep-by-step..
The solution
I wanted a solution which:
- Updates automatically whenever information changes
- Does non require user interaction – i.due east. no button clicking, but updates automatically when the worksheet recalculates
- Easily portable between different worksheets
I call back I managed to achieve this.
User Defined Functions (UDFs for short) are just similar normal Excel functions, such as VLOOKUP or SUM, but they have been created using VBA. UDF'south are intended to be custom worksheet functions to calculate a cell value. Whether on purpose or by accident, Microsoft have fabricated it possible to control diverse objects with UDFs. For example, it is possible to alter a worksheet's tab color, or to change a chart title (next calendar week's post). Thankfully, the minimum and maximum values of the chart centrality are controllable using a UDF. Horray!
The solution in action
The animated gif below shows the solution in action. The values in the cell are automatically applied to the nautical chart. Whether these values are typed in the cell or created using formulas, they will update the nautical chart.
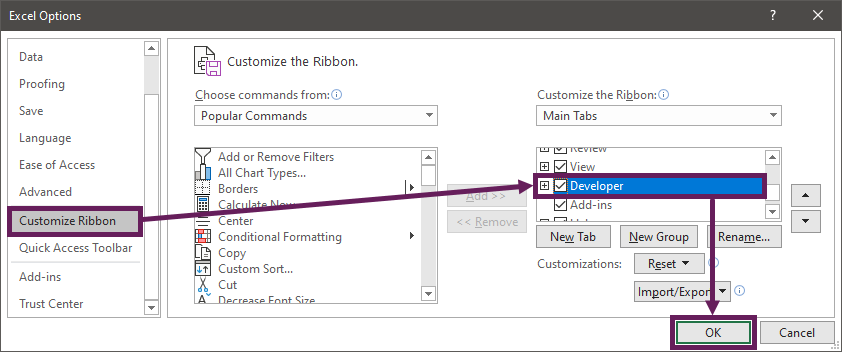
Brandish the Programmer ribbon
Right-click on a blank office of the ribbon and select Customize the Ribbon… from the carte
From the Excel Options window click Customize Ribbon, enable the Developer selection then click OK.
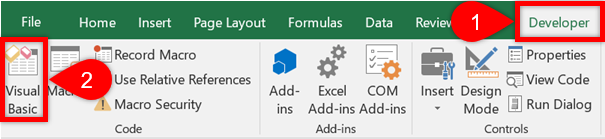
Creating the User Defined Office
To create the UDF click Developer -> Visual Basic (or shortcut ALT + F11).
The Visual Basic Editor window will open, click Insert -> Module
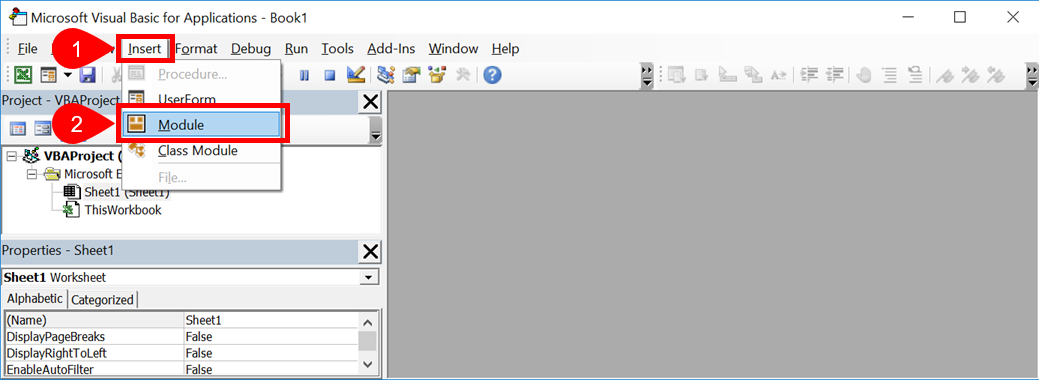
Add the code below to the Module as shown. The code for UDFs must be within a standard module to work.
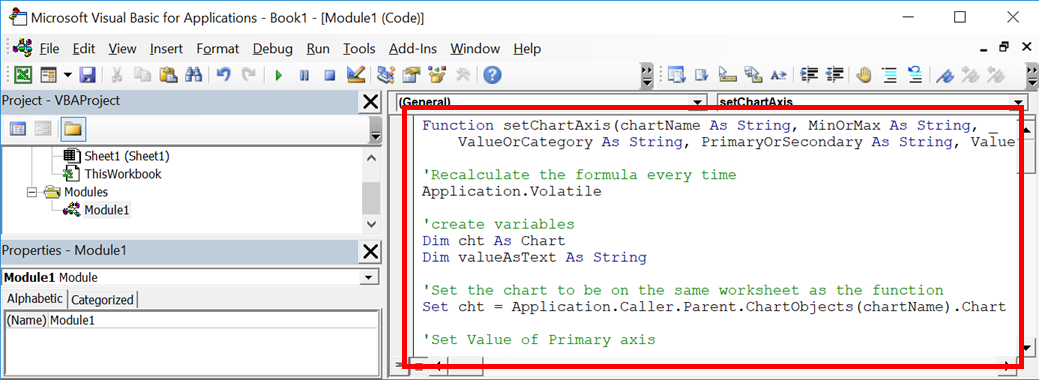
The VBA Code
Here is the VBA code to copy into the Module.
Function setChartAxis(sheetName As String, chartName As String, MinOrMax Every bit String, _ ValueOrCategory As String, PrimaryOrSecondary As String, Value As Variant) 'Create variables Dim cht Every bit Chart Dim valueAsText Equally Cord 'Gear up the nautical chart to exist controlled by the role Set cht = Application.Caller.Parent.Parent.Sheets(sheetName) _ .ChartObjects(chartName).Chart 'Set up Value of Primary axis If (ValueOrCategory = "Value" Or ValueOrCategory = "Y") _ And PrimaryOrSecondary = "Primary" And so With cht.Axes(xlValue, xlPrimary) If IsNumeric(Value) = Truthful Then If MinOrMax = "Max" Then .MaximumScale = Value If MinOrMax = "Min" Then .MinimumScale = Value Else If MinOrMax = "Max" Then .MaximumScaleIsAuto = True If MinOrMax = "Min" Then .MinimumScaleIsAuto = True End If End With End If 'Set Category of Primary axis If (ValueOrCategory = "Category" Or ValueOrCategory = "X") _ And PrimaryOrSecondary = "Chief" And so With cht.Axes(xlCategory, xlPrimary) If IsNumeric(Value) = Truthful Then If MinOrMax = "Max" So .MaximumScale = Value If MinOrMax = "Min" And so .MinimumScale = Value Else If MinOrMax = "Max" Then .MaximumScaleIsAuto = Truthful If MinOrMax = "Min" Then .MinimumScaleIsAuto = True Finish If End With Cease If 'Gear up value of secondary axis If (ValueOrCategory = "Value" Or ValueOrCategory = "Y") _ And PrimaryOrSecondary = "Secondary" Then With cht.Axes(xlValue, xlSecondary) If IsNumeric(Value) = True Then If MinOrMax = "Max" And then .MaximumScale = Value If MinOrMax = "Min" Then .MinimumScale = Value Else If MinOrMax = "Max" And so .MaximumScaleIsAuto = True If MinOrMax = "Min" Then .MinimumScaleIsAuto = True End If Finish With End If 'Set category of secondary axis If (ValueOrCategory = "Category" Or ValueOrCategory = "X") _ And PrimaryOrSecondary = "Secondary" Then With cht.Axes(xlCategory, xlSecondary) If IsNumeric(Value) = True Then If MinOrMax = "Max" Then .MaximumScale = Value If MinOrMax = "Min" Then .MinimumScale = Value Else If MinOrMax = "Max" Then .MaximumScaleIsAuto = Truthful If MinOrMax = "Min" Then .MinimumScaleIsAuto = True End If Finish With Terminate If 'If is text always display "Auto" If IsNumeric(Value) So valueAsText = Value Else valueAsText = "Auto" 'Output a text string to indicate the value setChartAxis = ValueOrCategory & " " & PrimaryOrSecondary & " " _ & MinOrMax & ": " & valueAsText End Function
That's all we demand to do to create the UDF, now it'due south gear up to utilize.

Using the office
The function nosotros accept created uses the following syntax:
=setChartAxis(sheetName, chartName, MinOrMax, ValueOrCategory, PrimaryOrSecondary, Value)
- sheetName = the name of the worksheet which contains the nautical chart.
- chartName = the name of the chart as a text string, or a jail cell reference to a text string. If yous're non sure of a nautical chart's name, click on the chart and look at the NameBox (the box to the left of the formula bar).
- MinOrMax = a text string of "Min" or "Max" to select whether the function volition command the Minimum or Maximum axis value.
- ValueOrCategory = a text string of "Value" or "Category" to point which axis to conform (volition also accept "Ten" or "Y")
- PrimaryOrSecondary = a text string of "Primary" or "Secondary" to bespeak which axis to adjust.
- Value = a number, or a text string. A number will adjust the centrality to that value, "Auto" will reset the centrality to Automatic.
For the function the work, the nautical chart must be in the aforementioned workbook every bit the function.
Dissimilar normal functions, UDF's do not display the order of the arguments when typed into the formula bar. Therefore, the all-time options are:
The screenshot below shows how the UDF is used:

The formula in Cell G12 is:
=setChartAxis("Sheet1","Nautical chart 2","Min","Value","Primary",E12) Resetting back to default centrality
If you lot decide to revert back to Excel'due south automatic axis calculation, that is no problem. Any non-numeric value entered as the Value (or in the cell reference linked to the value) volition cause the chart to be reset to automatic.
=setChartAxis("Sheet1","Chart 2","Min","Value","Principal","Auto") Download the example file
Sometimes it is easier to understand by seeing the UDF in activeness.
Download the file here.
Making the role available in all workbooks
If you wish to make the UDF available in all your workbooks:
- Include the code above within a new workbook
- Save the workbook every bit an Excel Add-in (.xlam file blazon).
- Install the Add-in you have created past following these instructions.
The part is now available in all your workbooks. If others open the workbook they will be able to see the part, but information technology will non work. If you want other users to utilise the function save it in each individual file.
Become our Gratis VBA eBook of the xxx almost useful Excel VBA macros.
Automate Excel then that you can save time and stop doing the jobs a trained monkey could do.
By inbound your email address y'all concord to receive emails from Excel Off The Grid. We'll respect your privacy and y'all tin unsubscribe at any time.
Don't forget:
If y'all've found this mail useful, or if you have a improve approach, so please leave a comment beneath.
Practice you demand help adapting this to your needs?
I'm guessing the examples in this mail didn't exactly run into your situation. We all use Excel differently, so it's incommunicable to write a post that will see everybody's needs. Past taking the time to empathise the techniques and principles in this post (and elsewhere on this site) you should exist able to suit it to your needs.
But, if yous're withal struggling you should:
- Read other blogs, or watch YouTube videos on the aforementioned topic. You will benefit much more than past discovering your own solutions.
- Ask the 'Excel Ninja' in your office. It'southward amazing what things other people know.
- Ask a question in a forum like Mr Excel, or the Microsoft Answers Customs. Retrieve, the people on these forums are by and large giving their time for free. So take care to craft your question, make sure information technology'south articulate and concise. List all the things you've tried, and provide screenshots, code segments and example workbooks.
- Use Excel Rescue, who are my consultancy partner. They help by providing solutions to smaller Excel problems.
What next?
Don't get yet, there is enough more to learn on Excel Off The Grid. Check out the latest posts:

Source: https://exceloffthegrid.com/chart-axis-min-mix/
Posted by: claytoncomillonall73.blogspot.com
0 Response to "How To Change Axis Units In Excel"
Post a Comment